Showing posts with label ATG BCC. Show all posts

Friday, February 21, 2014

Add Customized Repository in BCC UI of ATG 10.X

This blog show cases how to add customized repository in ATG 10.2. In many case we need to create new customized repository to meet the required customization. The blog explains how to add the new created repository in to BCC Merchandising UI.

We start the steps will underlying assumptions that we have created a repository component and it added to the versionManagerService.versionedRepositories list.

Let consider the new created Item descriptor in the new repository is NewItemDesc and has 2 properties namely displayName, secondProperty.

Add NewRepository Item in Browse UI
We have to created file at location /atg/remote/commerce/browse/MerchandisingBrowseHierarchy.xml as it is read by the /atg/remote/commerce/browse/MerchandisingBrowseManager. It contain the configuration for the browse UI which used by the flex code.

MerchandisingBrowseHierarchy.xml

To add the item descriptor in the home we have to add it in the browse-item with id =home.


Please find some explanations for some of the attributes and tags.

Browse-item: This tag is used create the plan to display.
browse-item
create-allowed
True/false, it will show the add button enable if it is true.
show-count
True/False, it will show count of number of child under it.
multisite
Any/disabled/enabled
label-resource
Provide name for the asset to display.
is-root
true/false
icon-resource
Is URL to show small image before name.

List-definition: This tag is used display list of items.
List-definition
show-count-on-header
True/false, It shows the count.
retriever
query
child-type
Provide full path of child item.
retriever-parameter
name="query" value="ALL"

View-toggle: Add entry in the sort option, where you can toggle the browse view for set of item to be displayed.
  • Id: id for the tag.
  • Initial-view: Should be one of the view tag name, which default and will be shown when preloaded.
Note: The toggle view can be seen in promotion display from the OOTB.

View: It is tag inside the view-toggle tag. It represent on view. This contains tag like list-definition, browse-item to create panel.


Still to come more.... for find panel.


Wednesday, February 19, 2014

Common Error in BCC Deployment

This blog highlight some of the error in BCC while pushing for deployment and while performing the deployment in BCC. Also provide some workaround and solution to resolve the issue. These are some common error while are seen while working with BCC tool by the users.

Lock Conflict
                Lock conflict is most common error which BCC user encounter while pushing the project for deployment. This is basically not the error in BCC, but a message which state that the project cannot be pushed for deployment queues as project contain some asset which are in process of deployment as part of the other project.
We can check the asset(s) which are/is the asset(s) which are/is part of the deployment as part of some other project and also get project name. We can click on the locked conflict tab in the project work flow screen as show in the screenshot attached below.
Resolution:
  • Wait till the project which contains the conflicted asset gets deployed, so the lock conflict is automatically resolved.
  • Remove the asset which is causing the lock conflict, but the change which are done in those asset will be lost, which can result in data corruption.  


Merge Conflict
                Merge conflict is the next step of the lock conflict. It caused when the asset which is part of the project is modified as part other project parallel and the other project is completed the deployment before push this project. Then will see   that project throw merge conflict and for that asset.
 We can see the assets which are causing the merge conflict for the project. We can click on the asset tab and it will show all the merge conflict at the top.
Resolution:
We can see the assets which are causing the merge conflict for the project. We can click on the asset tab and it will show all the merge conflict at the top. We can see a link saying merge conflict, click on the link which will show both the version that is the one which got deployed in the parallel project and the version which is modified as part of this existing project.


Snapshot Mismatch
         Snapshot error is caused when the agent JVM losses the snapshot and the snapshot is null for the agent.
  • This is generally caused when we cancel the deployment and not allowing it to rollback due to canceling of deployment will cause the agent lose the snapshot.
  • Agents lose the snapshot id even when we perform critical reset.


Resolution: we have to do a full deployment to restore the snapshot in the agent JVM.

Workaround: To perform a full deployment with a small set of data in BCC sound easy, but when we have large set of data, perform full deployment is time consuming task.
The workaround for resolving the snapshot error is forcing the snapshot using the DeploymentServer component in BCC dyn/admin.

  • Go to the CA Console >> overview >> (site which has error) >> project tab.
  • We will have list of projects which are completed status.
  • Copy the max snapshot ID which is the numeric at the right most columns.
  • Go to the /atg/epub/DeploymentServer in BCC dyn/admin.
  • We will have both the site. Force the snapshot by copying in the textbox and click init for the site which was showing the error.

Deployment hung in plan
                Sometime we come across a strange condition where we have pushed a project for deployment and it is in plan and also appears in the next project to be deployed. But the deployment is not getting started.

This happens in 2 scenarios
  • User has cancelled the previous running deployment (not rollback but cancelled).
  • User has halted the deployment.


Resolution:
  • If it is the case of 1st scenario the Accepting Deployments, will be false. We can see this flag in “CA Console >> Overview >> (Site staging/production)>>details”. When it is due to Accepting Deployments flag, then perform critical reset by click on “critical reset” button in “CA Console >> Overview >> (Site staging/production)>>details”. After this activity, agent JVM will loss the snapshot, please force the snapshot Id
  • If it is the case of 2nd scenario it will clear displayed, that “halted deployment” in red color in the “CA Console >> Overview >> (Site staging/production)”.When it is due to 2nd case then resume the deployment by click on “resume deployment” button in “CA Console >> Overview >> (Site staging/production)>>details”.

Various states of BCC Deployment

BCC deployment will go through various states. Each of the state performs a specific task.
The entire task combine is known as deployment.

Below are the states/tasks which are part of BCC deployment and what will each task performing.
  1.  Preparing
  2. Prepared
  3. Gathering Data
  4. Applying
  5. Applied
  6. Activating Switch (only if agent has switchable datasource)
  7. Activated Switch (only if agent has switchable datasource)
  8. Applying (only if agent has switchable datasource)
  9. Applied (only if agent has switchable datasource)
  10. Deployment Deleted
  11. Completed

Preparing: This is 1st state in BCC deployment, where the system analysis the snapshot of the old project which got deployed and will take if the agent has different snapshot, which means that the agent JVM missed some of the file.

Prepared:  This is 2nd state in BCC deployment, where the system analysis the snapshot of the old project which got deployed is completed successfully.

Gathering Data: It is the 3rd state in the deployment. It is part of pre-switching deployment. In the state the deployment collects the entire asset which needed to be deployed as part of deployment. Will creates the marker for the repository items which are part of the deployment.

 Applying: It is the 4th state in the deployment process, in the state the BCC writes the data to the passive schema of the non-versioned schema using the marker.

Applied: It is the next state after the applying state, as part of this event the agent JVM runs the CMS and other service which are configured in the Deployment Agent of the agent JVM.

Activating Switch: In this state where pre-switch activity is performed in the agent JVM. It is performed only when the agent is configured as switching data sources. As part of the pre-switch activity it will invalidate the cache.

Activated Switch: In this state of deployment the Agent JVM’s perform switching of data source from active to passive. Before perform the switching it will wait until the entire queries made to the active data source are completed, new query will be made to the passive data source.

Deployment Deleted & Completed: These are the last state in all the deployment where the BCC clean up the deployment data from the Deployment Repository and publishes the message for the successfully completion of the deployment of the respective project which are involved in the deployment.

BCC Deployment


This blog is to answer some basic question like what is deployment in BCC ? How do it works ? what are different types of deployment and what are the various stages/states of deployment. Let direct start with the most basic and first question which come to our mind.

What is deployment in BCC ?

Deployment generally means moving the built code too server, but when we use the term deployment in context of bcc the deployment means moving the data from versioned schema to non-versioned schema using the atg framework where as versioned schema means pub schema of bcc and non-versioned schema are the catalog schema like cata and catb of store jvm and stg_cat of preview/staging jvm.

How do BCC deployment works ?

In general deployment involves running the set of insert,update and delete script which are created using the data as part of deployment in pub schema.
The bcc server is connected to versioned and all the non-versioned schema of the ATG set-up. We also connect all the jvm (store) using RIM connection.
As part of deployment BCC created marker which are used to create the SQL statement which will be used to write to the versioned schema. This execution of the script is performed by the BCC server directly on the versioned schema (on passive schema). 
The RIM connection is used for file deployment and to send the deployment event to agent JVM's.

BCC deployment overview
Passive schema : When we have switch datasource configured, than the JVM will be reading the data from one versioned schema and the other schema is called passive schema.
Active Schema : When we have switch datasource configured, than the JVM will be reading the data from one versioned schema which is called passive schema.

 BCC will be connected to agent JVM and will know the schema name of the active and passive schema. Than bcc will start the deployment and will right the data into the passive. Once writing of data/transferring files is complete on the passive schema. It will trigger event for switching for agent , switch is process where the agent jvm make a switch between passive schema and active schema. that is after the completion of switching the passive schema will be active and active schema will be make passive. 
Now again the BCC will go head and complete writing of data/transferring file in passive.
activity/task performed by BCC after switch is to maintain the synchronization between schema.

Create Custom Workflow in ATG 10.2

This blog show cases how to create customized workflow in ATG 10.2. In some case we need to create new customized workflow to meet the required customization. The blog provide the step to create a customized workflow.

Step to create new workflow

Create Workflow *.wdl file
  • Open the ACC of BCC server and go to Workflow >> Publishing
  • Default you will have Common folder which contains default workflow (commonWorkflow.wdl)
  • You can create new workflow in the same folder, if you want the new workflow should be available for editing all the asset (Catalog, Content and Site Asset). Or create in Commerce (Catalog Asset), siteTemplates (Site Asset), Personalization (Personalization Asset).
  • Create the workflow and save it
  • After restart of BCC the newly created workflow will be available.
  • We can create project using this workflow, but will not have normal BCC UI,  BCC show error message saying application Id not not found for the project.
  • We have to modify 2 xml for registering the application ID for the workflow namely (/atg/commerce/web/workflowActivities.xml, /atg/remote/controlcenter/service/merchandising.xml)

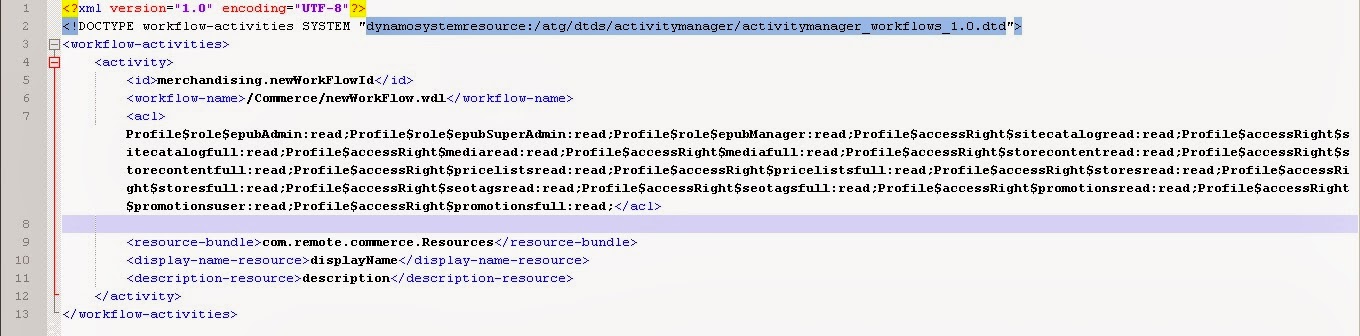
Create WorkflowActivites.xml

  • We have to add the entry in the workflowActivities.xml for creating a activity for the new workflow.
  • In workflowActivities.xml mention activity Id, which should be unique id (i.e. merchandising.newWorkFlowId)
  • Provide the name of the newly created workflow, which should be full path inside the /atg/registry/data/epubworkflows/ (it will be like /Commerce/newWorkFlow.wdl). Same will be mentioned in wdl file of the workflow /Commerce/newWorkFlow.wdl
  • create a Resources bundle file to provide the displayName and description, which has be added in workflowActivities.xml file
  • Provide displayName key in the displayName
  • Provide description key in the description
  • Provide warning key in the warningwarning message is show when user click on the link to create project.
  • you can add the in the activity, to add the browse option in your workflow as it show in front of Commerce Asset
  • URL in page-2 tag should be /ControlCenter/index.jspThis is the jsp which is loaded on clicking on browse URL.
  • Activity-id in page-2 tag will be like merchandising.browseCommerceAssets.

Create merchandising.xml

  • We have to add the entry in the merchandising.xml for creating a application for the new workflow.
  • Provide the same name as of the activity Id for create the application tag. 
  • Provide the resource bundle Resources
  • Provide the displayName key which is in Resource Bundle displayName
  • Provide the name of the newly created workflow, which should be full path inside the /atg/registry/data/epubworkflows/ (it will be like /Commerce/newWorkFlow.wdl). Same will be mentioned in wdl file of the workflow /Commerce/newWorkFlow.wdl in the  Tag
  • Provide 
  • Please find the attached file to see more in details.
Above step will create new workflow, will be able to create project and edit asset using the BCC UI.

merchandising.xml - Part1

merchandising.xml - Part2

workflowActivities.xml